Whirlpool bath by definition: A bath of varying sizes and material that has a pump for circulation of the water by use of the jets and a suction return. Whirlpool baths are often refer to as Jacuzzi tubs, Jacuzzi Bathtubs, whirlpool bathtubs, whirlpool Tub, jetted bathtubs, Jetted tubs, Roman tubs, Whirlpool Jet Tub, Corner whirlpool, Corner Jacuzzi, Jet Tubs, bubble tubs, Jaccuzzi tubs, Jacuzzi Tub, Jacuzzi bath and Jacuzzi Bath Tubs.. Jacuzzi is a registered trade mark of Jacuzzi Corporation and is not consider a generic term for whirlpool bathtubs, although it is often used this way. Izzi is a manufacture of it own 60 styles and designs of whirlpool baths and has no association with Jacuzzi Corporation.
Air Baths by definition: An air bath uses a blower to force air into the bath water by use of a blower and air jets or orifices. A Air bath can be refer to as a bubble tub, air tub, air bathtubs, air-bath, Air-Tub, air bath tub, Blower bath, Airpool tubs, and blower tub.
Non-whirlpool baths: Roman bath, Soaking Bath, Soaker bath, Roman Tub, acrylic bath, Acrylic Tubs, Acrylic Baths, Big Tubs, Oversize Tubs, Oversize Bathtubs, Non-Jetted tubs
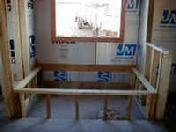
Framed Tub Deck Using 2X4 Lumber A leveled frame is built from 2"x4" lumber where the rough opening is approximately 1 inch smaller on all sides than the actual tub. This will allow the whirlpool or soaking bath to drop into the opening without obstruction and for the flange of the bath to rest on the framing
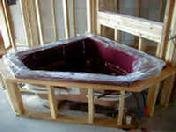
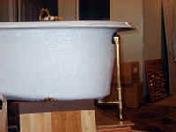
Framed Deck with Bath Installed Ready for Plumbing Connections and Shimming At this point the bath can be dropped in and allow to hang from the framing. Most decks can be built at a height of 20" or higher to allow proper room for setting and installation of the plumbing, waste overflow & drain.
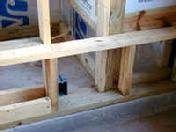
Whirlpool in Framed Deck & Access to the Motor Most building codes require that there is an access door no smaller than 16"x16" in order to access the whirlpool motor. Non-whirlpools do not require this access door. It is easier to locate the access through an adjacent room such as a toilet room or the garage or even a closet. It is less desirable to create an access through the tiled deck or tiled walls because of the cost and difficulty in making the door both attractive and functional. These pictures show a typical access door at framing and then after the whirlpool is installed. The access door should allow the home owner to easily reach in and disconnect the motor from the whirlpool and remove the motor from under the deck.
The pump should be close enough to the access panel to make removal easy and to prevent the unnecessary removal of piping and framing.
Framed Access Door with Electrical Plug In All Izzi whirlpools require a 110 Volt,20 amp GFCI circuit to supply power to the whirlpool motor and light if installed. A standard electrical plug in should be provided within 24 inches of the motor location. Optional equipment such as inl-ine heaters and dual motor systems may require additional power requirements. You should ask your sales representative if you are considering these options.
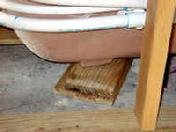
Shimming After the drain and faucet are connected, the final step is to support under the base of the bath so that the bearing weight is transferred to the floor or slab and not to the framed deck and tile. If the weight is allowed to transfer to the tile, you could have problems with the grout cracking under the weight of the water when filled. Supporting the bottom of the bath is very easy with Izzi baths. You simply find an easy to reach location on the bottom of the bath and shim using pressure treated lumber or cedar shims. Shimming is a simple way to prevent the bath from settling downward when filled with water. It transfers most of the bearing weight to the floor or slab. We do not recommend the use of concrete for supporting under the bath because of the shrinkage that takes place as the concrete dries. It tends to leave a gap that allows the bath to settle when filled. Foam is not an alternative for support, either. Shimming in one location is usually sufficient to support the weight of the bath. Due to the superior construction of the Izzi baths, you don�t have to be concerned with flexing on any of the bottom surfaces of the bath. The floor or bottom of each Izzi bath is approximately an inch in thickness.
Installation of Izzi Skirted Baths
Emerald-5SK shown without doors installed
Installation of the IZZI Emerald-5SK left or right Whirlpools The Emerald-5SK is designed for installation into a framed alcove, and functions as a bath and shower. Installation Steps:
Frame a ledger board on all three walls of the alcove (1x4 or 2x4) so the bath will be suspended by a height of � inch to 1 inch, at its lowest point when slid into the framing. The ledger board supports the tub deck flange and assures a level installation and stable surface for tiling. The height of the ledger varies according to model from 18-20 inches. A field measurement should be performed to assure the best height. Installing the bath approximately 1 inch off the floor provides easier connection of the drain and waste overflow assembly.
After the bath is leveled in the alcove and resting on the ledger board, adjust the support legs to the floor to share the load of the bath with the ledger board.
If the sub-floor is not entirely stable, shims or mortar may also be used to prevent movement. Stepping into the bath is a good test of stability.
At this point, the drain can be connected and the bath water tested.
The tiling flange is intended to prevent leaks and not to attach the tub to the framing. Do not run screws into the tiling flange. Tile board and tile are then installed over the tiling flange
The following methods can also be applied in situations where the ledger has not been install prior to the installing of the bath or in situations that prevent a full ledger board installation prior to the bath installation.
The reason for the ledger is to add support and to prevent any movement that may cause a grout line crack in the future. For example, if someone heavy where to place their foot on the tub flange. A entire ledger board is not necessary as long as the back, front and middle have support at each stud. This can be accomplished by screwing a wood block under the flange to the stud wall. The most important locations are the right and left ends of the tub and middle.
The underside of the flange is a consistent even trimmed edge and the simplest setting method is to suspend the tub from the prel-eveled ledger and then lower the legs to the floor.
Screwing into the ABS tiling flange is not recommended due to it providing little structural support and can result in cracking.
Screwing into the fiberglass under the flange will provide good support, but would require a hole to be drilled to prevent possible damage and cracking to the flange.
If you have installed a tub without a ledger or under flange supports, they still could be added by access through the panel doors or by the following method.
Adding support after the fact.
A hole can be drilled from the opposite side of the stud wall into the stud, that is bigger then the head of the support screw and driver and to a depth of approximately half the stud depth, and at the height of the center of the fiberglass tub flange. This is to counter sink the screw head and reduce the required screw length. Then a smaller hole is drilled as a pilot into the remainder of the stud depth and into the fiberglass flange, for the actual screw size used. This method is very quick after the measurements and locations are determined. Naturally you need to be cautious not to drill into the tub side walls. Drywall screws of sufficient lenth can be used.
After completion, You should test your work by applying your weight to the flange in various locations and watch for any movement or settling. If the surface of the deck is solid, you are good to go. Othewise, add aditional support.
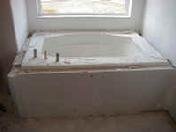
Waste Overflow The waste overflow and faucets are installed after the bath is set into the deck and before setting materials are used to level and secure the bath. This is because it is easier to install the piping to the faucets and the drain when the tub can be moved and adjusted. This part of the installation is usually done by a professional plumber but can also be performed by a handyman or do-it-yourselfer. It is important to use a good quality faucet due to the fact that this area will be covered up and changing it out in the future can be expensive.
Incorrect Sheathing Using Drywall Board This is where you can be as creative as you want. The most important thing to remember is to use the correct subsurface under your tile. Use Durarock or tile board �not drywall� or plywood. It is acceptable to use a plywood sheathing to build your bath deck but this should be covered in a waterproof tile board and not left as the subsurface for the tile. The reason for this is that the tile grout will transfer moisture to the underlying wood and it will swell when exposed to the moisture. The deck can also be built of cultured or real marble or granite. These materials are waterproof and usually are installed in slabs that don�t require any special subsurface.
Installing an Oval Drop-in Tub in the Deck
Opal 6
Oval Drop-in Tub deck installation If you using an Oval drop-in bathtub, you will need to build a plywood subdeck and cut out the hole for the tub. Ask you sales representative for a template, place the template on the plywood and trace around it. Using a jigsaw, cut the hole for the tub. It is a good idea to check the fit of the tub before applying the waterproof decking material. The tub is usually installed on top of the finished deck, and shimmed like described above.
Showroom and Business hours Monday - Friday: 8:30am - 5:00pm eastern time
Izzi Bath And Spa 19250 US Hwy 27 Clermont Florida 34715 352-394-8399 800-214-7440
Fax 352 394 2101
Izzi Acrylic whirlpool Bath Factory in Clermont Florida 800-214-7440